
Welcome to Pytavia
Welcome to Pytavia’s documentation. Get started with Installation and then get an overview with the Quickstart. There is also a more detailed Tutorial that shows how to create a small but complete application with Pytavia. Common patterns are described in the Patterns for Pytavia section.
Pytavia depends on MongoDB and Flask which can be found in the links below:
User's Guide
This part of the documentation, which is mostly prose, begins with some background information about Pytavia, then focuses on step-by-step instructions for web development with Pytavia.
Event Based (pub/sub) Programming
There are some cases where you want your application to take action when an something occurs and is triggered from outside the app its self. This could be data coming from some real-time equipment in the field , or a user triggers an action that causes a certain record to get updated that you want to know about
.
With this sort of requirement the design patter used is the publish – subscribe design pattern and is useful in many different types of real-time programming scenario’s.
Pytavia helps with this kind of development right out of the box using the code below. Lets see how it actually works and how it may help your project.
Lets annotate this simple bit of code
- The function register_handlers is a standard function in the event based start module in the Pytavia framework. So it is always part of the boiler plate code
- The self.register_handler() API call is made into the parent class of the main startup class. This subscribes the or (listens) to events or updates that occur on a given MongoDB collection using a user defined class
- The self.register_handler function call takes an object with a few parameters which are:
- handler_name which defines the the name of the handler created. This is usually to help with debugging and logging
- collection which defines the collection that the handler is listening / subscribing too. If an update occurs on the given collection the user defined class’s event_switch function will be called
- handler which defines the user defined event handler that is to be invoked given an action happens on the collection that the user is listening on
- filter which defines the query that can be defined by the user for which events are to be sent to the user defined event handler class. There are cases where you want to listen only on a specific field update in the collection, this filter helps minimize events being sent to the user defined event class
REST API’s
If you want to develop standard HTTP web applications and API’s you can develop them using the core Flask framework. Using this you simply follow the Flask standards and your on your way.
In the example above, its showing how to define a POST and a GET request route and how to define the functionality behind the route.
You can place your code modules within the the pytavia_modules folder and the same module can be used in your event based development or REST API’s
The main packages you need to install Pytavia is simply the flask package and also the pymongo package.
Installing these two packages will allow you to get the framework running , however most of the apps I develop usually require some of the most common libraries below so I will include them as suggested packages to install

MongoDB is a core requirement of the Pytavia framework , especially around the event based mechanisms as it uses the MongoDB data streams functionality rolled up into an easy to use Pub/Sub interface.
Installing MongoDB is easy on windows, Linux or even a Raspberry PI 4 running 64 bit UBUNTU (if you want the latest version) . If you are willing to run MongoDB 2.6 on a 32 bit PI then you can also install it on Pi3 B’s.
You can find all the documentation on how to install MongoDB on your required platform in the link here.
Pytavia File Structure
Pytavia follows a systematic director structure that defined where all your files and where the various framework files go. Here we will go through what each of the directories mean.
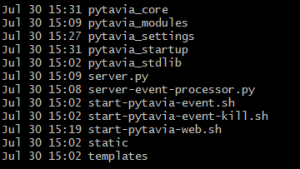
- pytavia_core has the core files that every pytavia project will have and is part of the standard boiler plate plumbing code
- pytavia_modules has the user defined modules. You simply create your folders in here and define your py files that provide the functionality
- pytavia_settings has the recommended modules to install
- pytavia_startup has the configuration files that are defined per environment. So if you have a production, staging and development environment you can define your configuration files here
- pytavia_stdlib has the library files that are most common in projects and are defined project wide. So if you define a module that will be used in all the other user defined modules its a good idea to place those files in here
- server.py runs the http server for your pytavia application
- server-event-processor.py runs the event processing server for your pytavia appliation
- start-pytavia-event.sh will start the event server of your pytavia application
- start-pytavia-web.sh will start the http server for your pytavia application
- static will define all of the static web application files that you need for your web application. This includes JS / CSS and other static files including static HTML files if any
- templates will define all fo the html templates that you have for your web application
Pytavia_core
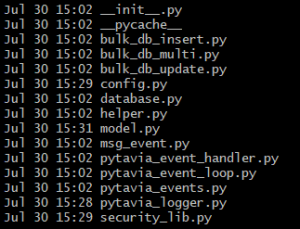
Within Pytavia core are the following standard files
- bulk_db_* will allow you to insert / update / delete across multiple documents within different MongoDB collections safely. This will ensure that if a transaction across multiple documents is required it will happen in an “all or nothing” ACID way. The following files provide a standard way of doing it across your whole code base
- config.py is where your application configurations are set once they are read out of the environment configuration files found in pytavia_startup
- database.py is how your application connects to your MongoDB database
- helper.py provides helper functions and objects for your request response between Pytavia microservices and to client code
- model.py is where you define your database modules if your application requires a standard SQL like collection model
- msg_event.py defines the standard event that is sent when a subscribe event is triggered from the database
- pytavia_event_handler.py defines the standard parent class you should inherit from if you want to define an event handler for the event based component of Pytavia
- pytavia_event_loop.py defines the standard parent class you should inherit from if you want to define a customized event loop class within your application
- pytavia_events.py defines the the main event processing module that helps provide the pub/sub interface for your event based python application
- pytavia_logger.py is simply a wrapper around pythons standard logger class
- security_lib.py defines the security modules that are used if you require checksum protocols between each and every service or Pytavia instance being called.
Staring Pytavia
That’s easy, after all your modules are installed you simply do